Three new versions and still just a single source file on your hard drive. Everything is virtual until you opt to export the new version to a new output file.
If you’re like me, you’re always hanging onto your original versions anyway. So this really creates no additional files on your disk until you export – actually saving you some space and more freedom to play what-if with your images. Oh yeah, and Lightroom lets you work not only on RAW files but also DNG and JPG images!
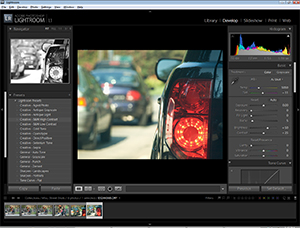
The workhorse of Lightroom: the Develop module
Lightroom’s interface features five modules to assist with you workflow process: Library, Develop, Slideshow, Print, Web. Library is where you import images into a Lightroom database – and you can have as many as you like. You have the choice of importing the images to a new directory or using them where they are. There is also a importer widget that runs in the system tray, but I hate automatic processes like that and always turn it off. I prefer to import my pictures from my memory cards directly using Windows Vista Explorer – but your mileage may vary in this regard. It is certainly going to be easier for novice users to let Lightroom handle things automatically.
The Library interface is setup so that the left panel is for finding photos via keywords, collections, image metadata, etc. The right shows information about the current image including histogram, metadata, keyword editing, and even allows quick application of preset development settings.

Lightroom lets you work not only on RAW files but also DNG and JPG images!
At the bottom of this module is a filmstrip view of all the images that meet the search criteria in effect. Clicking on one of these thumbnails makes that image current.
The center panel lets you view the larger version of the current image or images in a Loupe, Grid, XY Compare, or Survey mode letting you choose which photos are keepers and which are junk. To that end, you can assign ratings (0-5 stars), flags (Pick vs. Reject), or Color labels to each image with a single keystroke. These tools are freeform and you use them as you best see fit. Personally, I work from a keep/reject process for most shots and only use flags to subcategorize the “good” images in determining which of them are the best of the best. But again, it’s totally up to you, Lightroom simply provides the tools.
For Further Development
When you’ve selected the images you want to work on, click the development module and the current image is carried over as the current image there as well. The same filmstrip view occupies the bottom of the screen with the same filtered images you had in library – these will carry through all modules, keeping your workflow moving.